


Cado Security Labs operates several honeypots for various services, enabling us to discover novel malware and threat vectors targeting popular software. In the past, we have utilised T-Pot, a very commonly deployed low-medium interaction honeypot system that mimics various services such as SSH and Redis. This, combined with our own analysis, directly led to our discovery of P2Pinfect.
As Cado Security works at the cutting edge of cyber security, we frequently see reports of exploits and attacks targeting services that we do not have the capability to honeypot, such as GitLab or Confluence. At the same time, we also wanted to move towards higher interaction honeypots, allowing us to gain a deeper insight into the attack's lifecycle.
This led to the development of the Cloudypots system - a system leveraging OpenStack to run honeypot VMs safely and efficiently.
The Concept
The need for a new honeypot system arose during an investigation into an increase in exploitation of the GitLab CVE-2021-22205 vulnerability. Due to the convenience of OCI images (Open Containers Initiative images, the standard for shipping app container images) for systems like Docker, we began looking into deploying OCI images of vulnerable services into Firecracker containers that we could then instrument. Both Docker and Firecracker can run OCI images, but Firecracker uses a secure virtualized environment, which is more suitable for running untrusted code. This would allow us to take any image from docker hub and use it securely as a honeypot.
Using Firecracker for this purpose was ultimately scrapped, as using a container limited what we could implement, and Firecracker seemed to have fewer features than plain KVM.
OpenStack was then selected to be our hypervisor of choice for the project. While others may have opted to use just plain old libvirt and write their own logic around it, we determined that OpenStack already had the functionality we wanted available via a simple Python wrapper, and our team was already familiar with OpenStack from other projects. We did not want to use an actual cloud provider for the project due to the risks associated with intentionally running malware and using OpenStack allowed us to build our own cloud environment on any host.
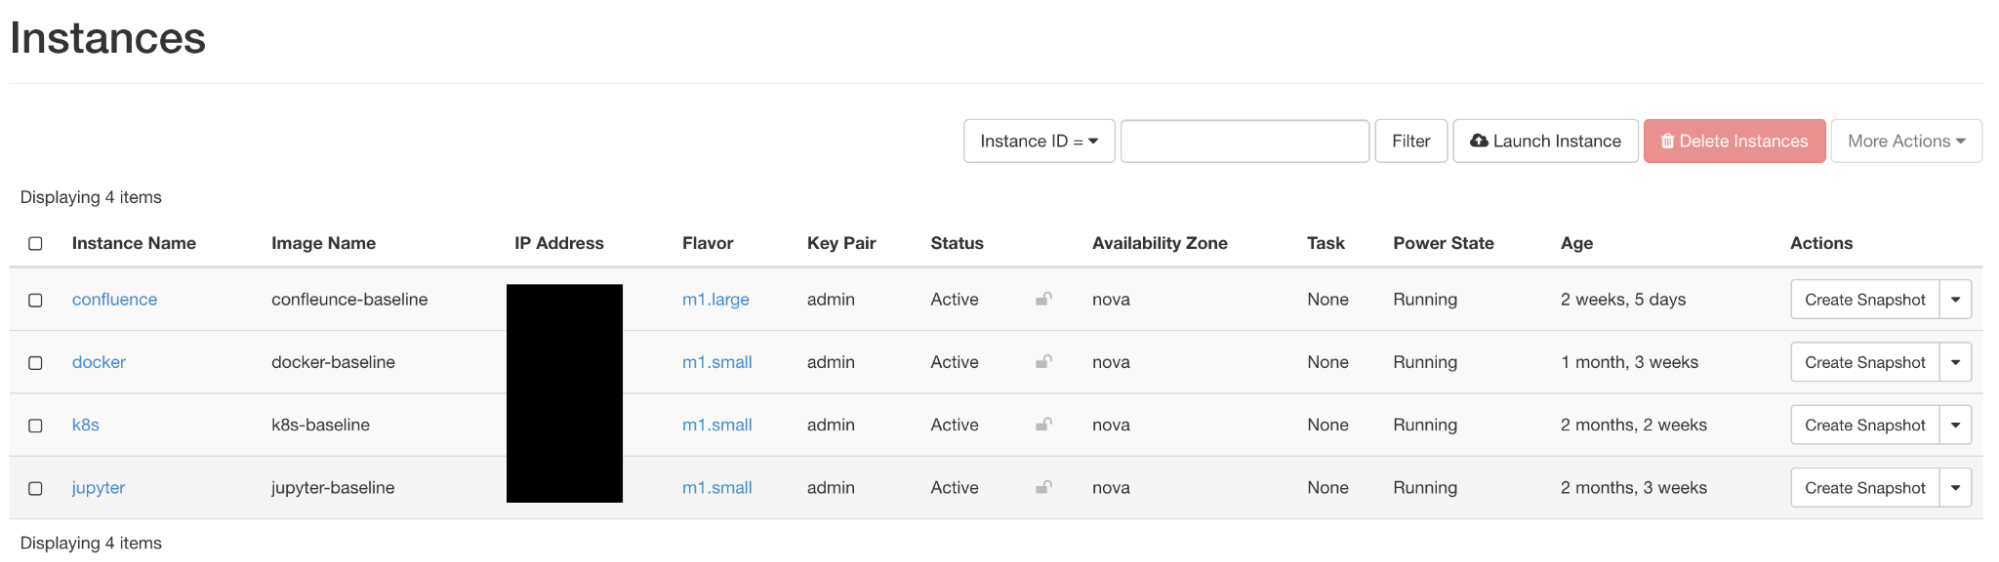
The OpenStack instance overview
The premise for how our honeypot VMs would work was simple. First, we deploy a vulnerable service in a VM, configured with ample logging to make it easier to identify attacker activities. We also use OpenStack’s metadata service to generate a new set of Thinkst canary tokens each boot, and automatically place them in credential files such as .aws/credentials.
We then have a guardrail system placed on the host that flags suspicious activity (see guardrail section) and automatically runs an “autopsy” on the VM. This process involves pausing the VM, dumping the memory, disk, and network traffic. This is then automatically analysed using the Cado platform and volatility3, which highlights interesting processes, discards duplicate attacks, and tracks the autopsy in Jira. The VM is then reset back to a golden image.
The Guardrail
As the purpose of the honeypot is to be intentionally vulnerable, it is important we have a guardrail in place to detect compromise and prevent the box being used to attack other parties.
The first element of the guardrail is strict security groups within OpenStack. We use stateful rules to only allow inbound traffic to the honeypot, and strictly limit outbound traffic to ports that are required for the honeypot to still function (e.g. NTP, HTTP(S), etc). Thus, even if an attacker was to start scanning the internet for exposed SSH ports, for example, the traffic would not leave our honeypot.
The next component is our detection system. It uses two main sources to gain information on the honeypots, namely a live capture of its network traffic, and the data stored in prometheus (a monitoring and time-series database) from libvirt exporter (a tool to collect VM metrics).
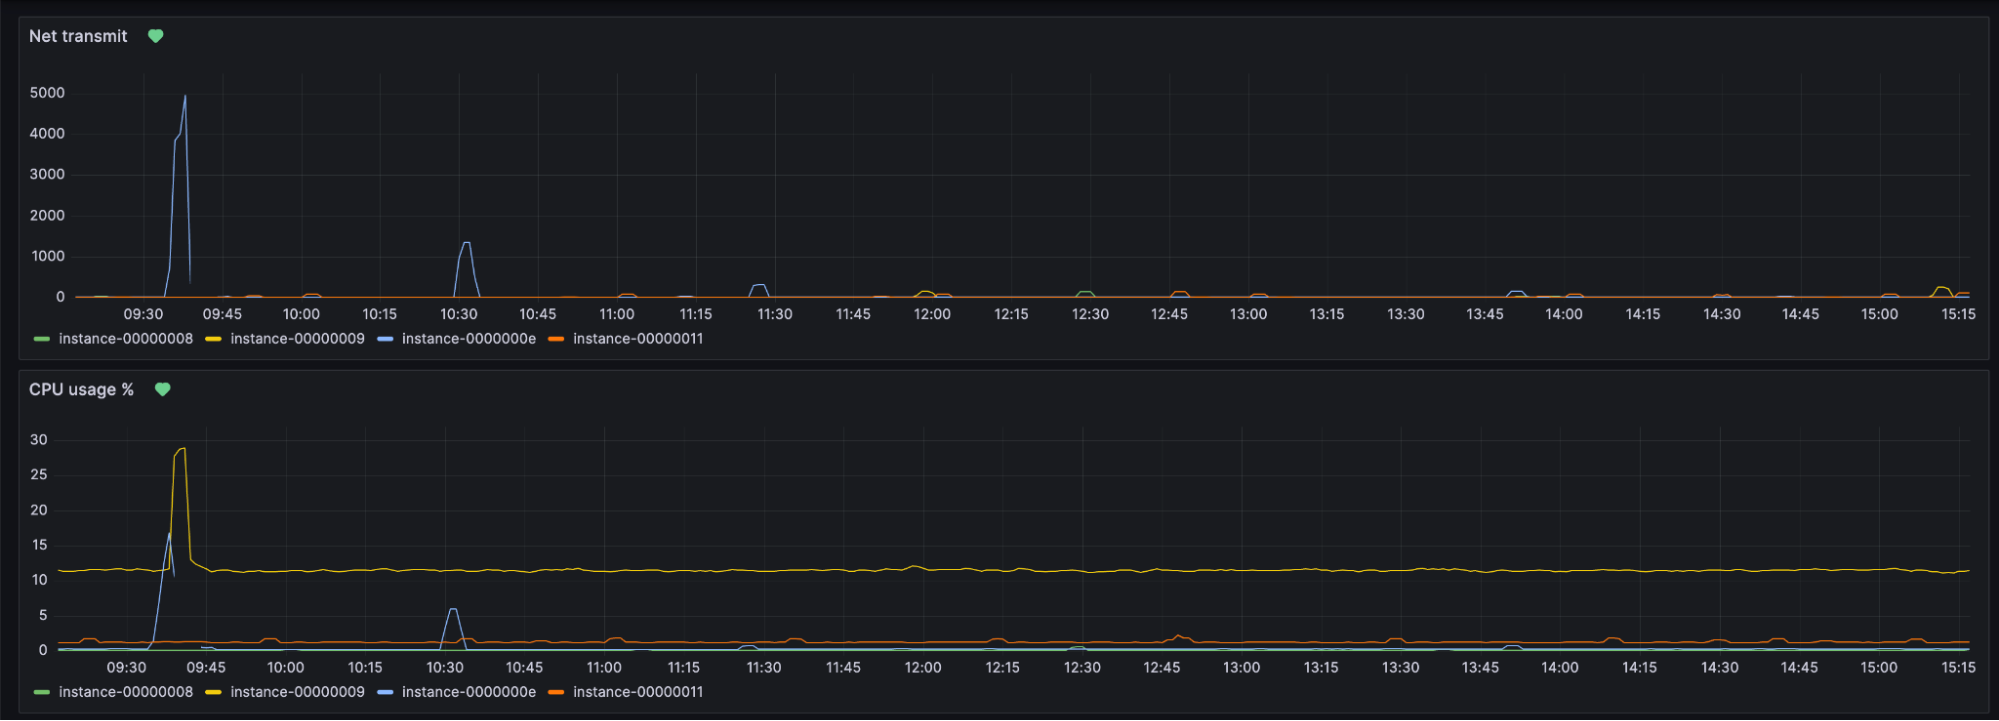
Grafana visualisation of data collected by Prometheus
The guardrail runs a capture of all traffic leaving the VM, prior to security group screening. As our goal is detection of compromise it is important we do the screening before the traffic is filtered. This allows us to see what the attacker is attempting to do, rather than just traffic that slipped through. The captured traffic is then put through the following rules:
- Port scanning detection - look for patterns of SYNs sent to one IP on several distinct ports in a short period of time.
- Masscan detection - look for patterns of SYNs sent to a large number of distinct IPs on one port in a short period of time.
- Blocklisted port detection - Check for SYNs sent to a list of ports. While the security group will block these packets, we still want to identify when this happens.
- Non-allowlisted port detection - Check for SYN-ACKs originating from ports on the service that shouldn’t be open. This is an indicator of a shell being placed on the honeypot.
The main purpose of these rules is to look for patterns consistent with self-spreading or worming behaviour commonly implemented by malware.
In addition, the guardrail performs queries to prometheus to look for the following conditions:
- Elevated CPU usage above baseline for more than 5 minutes. This is indicative of cryptomining.
- Elevated network traffic above baseline for more than 5 minutes. This is indicative of a denial of service attack.
The main purpose of these rules is to look for common objectives of malware that we and third-parties have observed targeting these services. Often the end objective of these has been either to cryptomine or launch denial of service attacks.
If any of these rules are tripped, an autopsy is triggered.
OpenStack provides a metadata service for cloudinit which allows for each honeypot to call out to 169.254.169.254, this is configured to then proxy the request to the guardrail script with the instance ID. Each honeypot will, on boot, call out to guardrail via this service. The guardrail then generates a canary token using Thinkst’s canary token service and returns it to the instance, which then places the tokens in locations such as .aws/credentials.
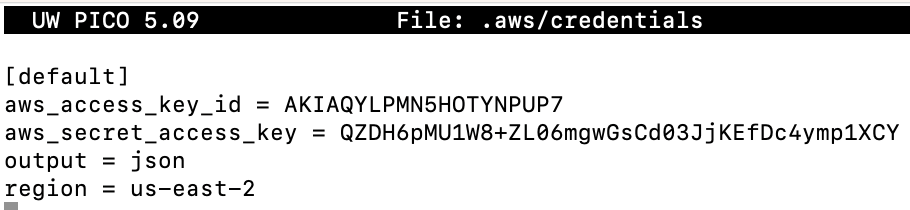
Example AWS canary
The honeypot agent then sets up monitoring to detect these files being accessed, and informs the guardrail if they are. This then triggers an alert that goes out to the team on Slack with which file was accessed so we can monitor any further activity from the attacker.
In the event the attacker attempts to use the credentials, we receive an email from Thinkst with details such as the ID of the token (a composite of the VM hostname and the time the token was issued to distinguish source and attack campaign), the IP of the attacker, and what they attempted to do with the token.
Additionally, a number of bait executables were placed on the system for common command line utilities exploited by attackers, such as AWS, docker, etc. When any of these executables are run, they report to the guardrail, triggering an alert.
To monitor the exploitation of services, the honeypot agent also follows the logs from the vulnerable services and prints them to the serial console. On the host, the guardrail reads from the serial console and passes the logs to fluentd, which parses them into JSON formatted fields before uploading them to elastic. This allows us to easily track campaigns by querying Kibana. For example, to track OracleIV, we simply searched for the name of the Docker image in Kibana and obtained detailed statistics on all instances of the image pull events related to the campaign.
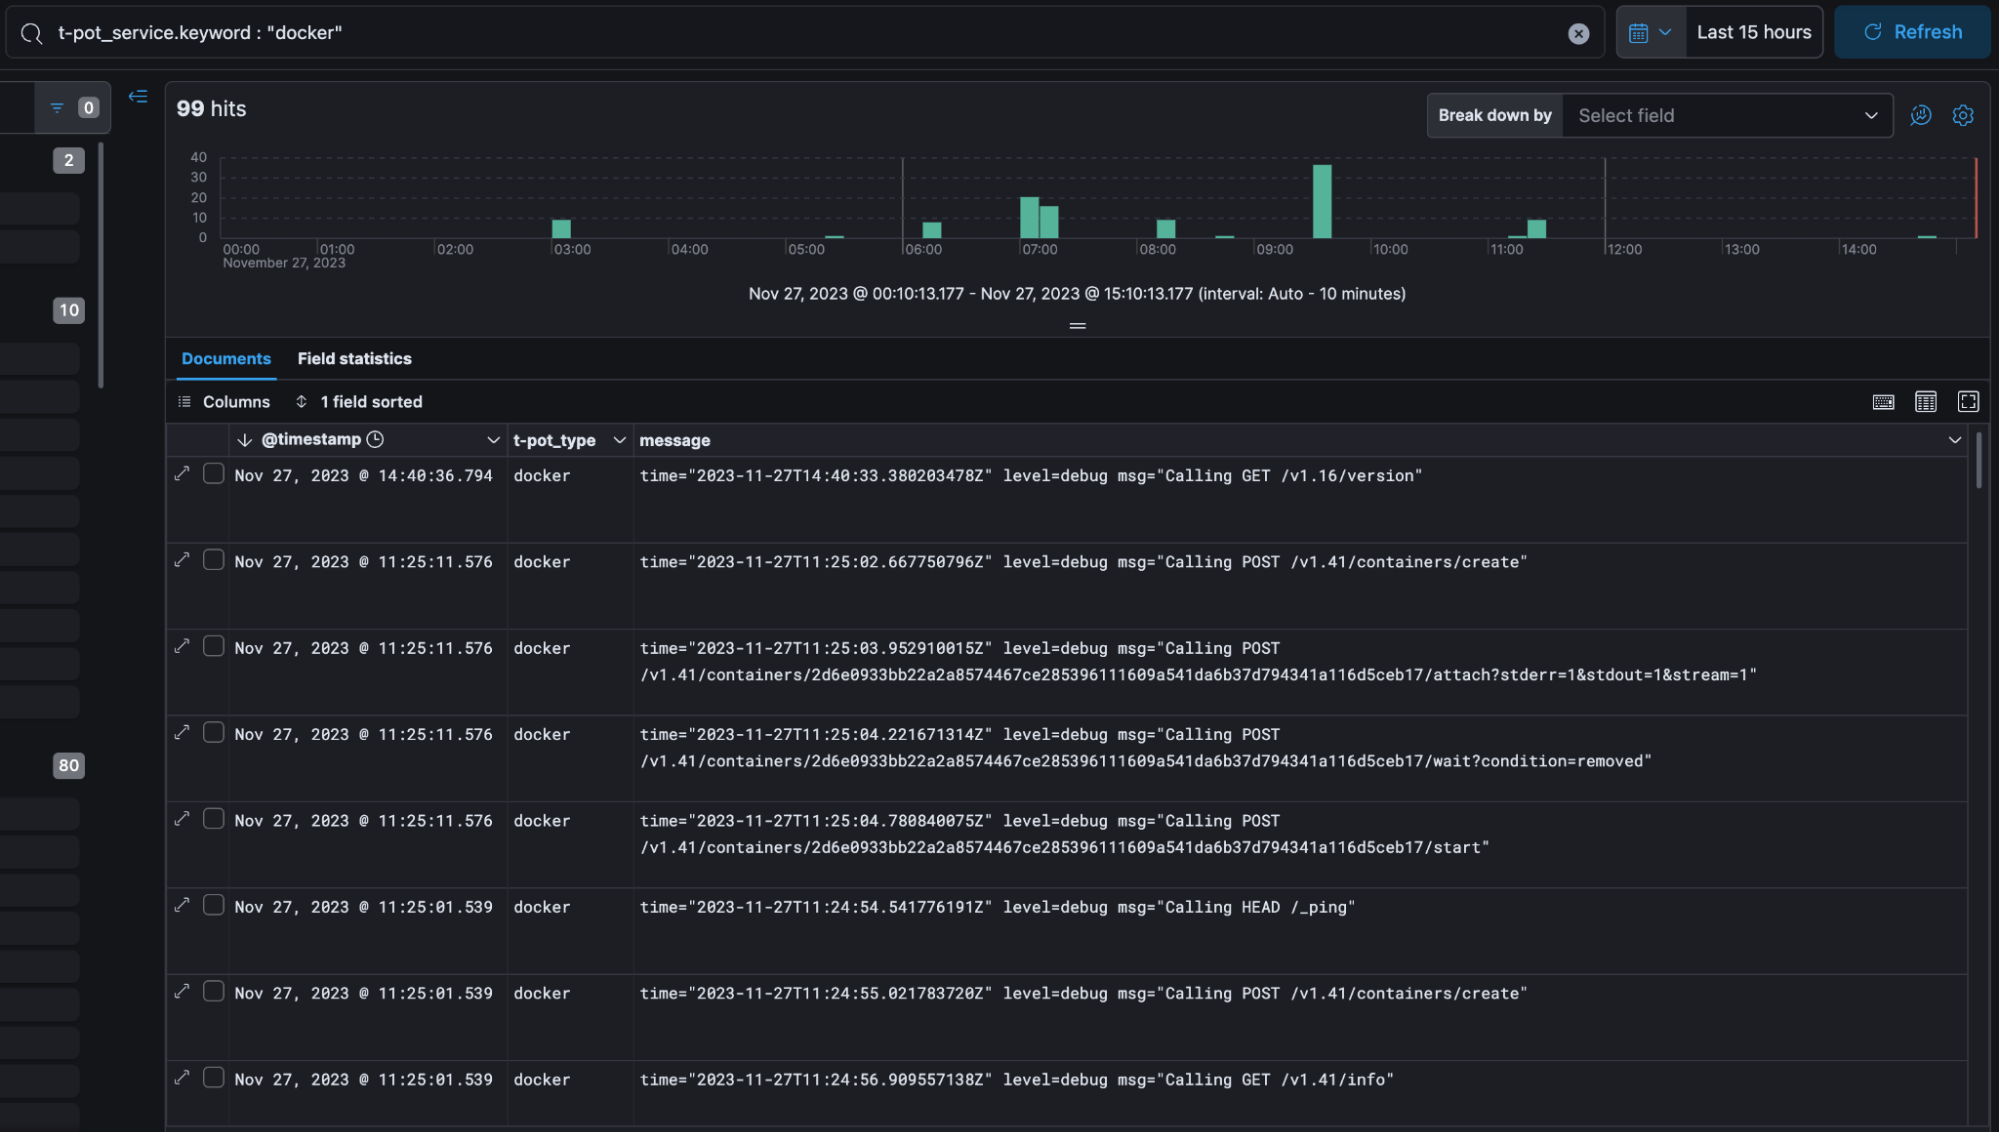
View of events for docker on Kibana
When an autopsy is requested on the honeypot by the guardrail, the VM is paused. This instantly halts the CPU in a way that is transparent to the OS, so all volatile artefacts are preserved.
The honeypot’s disk image is then cloned by using the qemu-img tool to copy the data from the qcow2 disk and backing block file into a singular dd-style raw image, which is easier to process with analysis tools, and allows for direct mounting as a loop device. The virsh dump tool is then used to dump the memory (or rather a qemu suspended image, but this can be processed as memory in Volatility), and a pcap of the honeypot’s activity since the last autopsy is also saved. This is all then uploaded to S3.
After the artefacts are saved, the guardrail then instructs OpenStack to restore the honeypot to the golden image, created after the VM was first set up. An alert informing the team that the honeypot was rebuilt and where the artefacts were saved to is then delivered to Slack.
The upload of the images triggers a Lambda Function, which adds the artefacts to an SNS topic read by an EC2 instance. The instance pulls down the disk and imports it into the Cado platform, as well as the memory image which is passed through volatility3. It then triggers another Lambda with the results of the analysis. The Lambda then determines if it is interesting, and creates a Jira ticket with the information if so. If it is identical to another attack, then it is tagged in S3 and deleted after a few days (in case we decide to keep it). This is to save space, as previously we had several terabytes of autopsies, as well as saving time triaging already seen attacks.
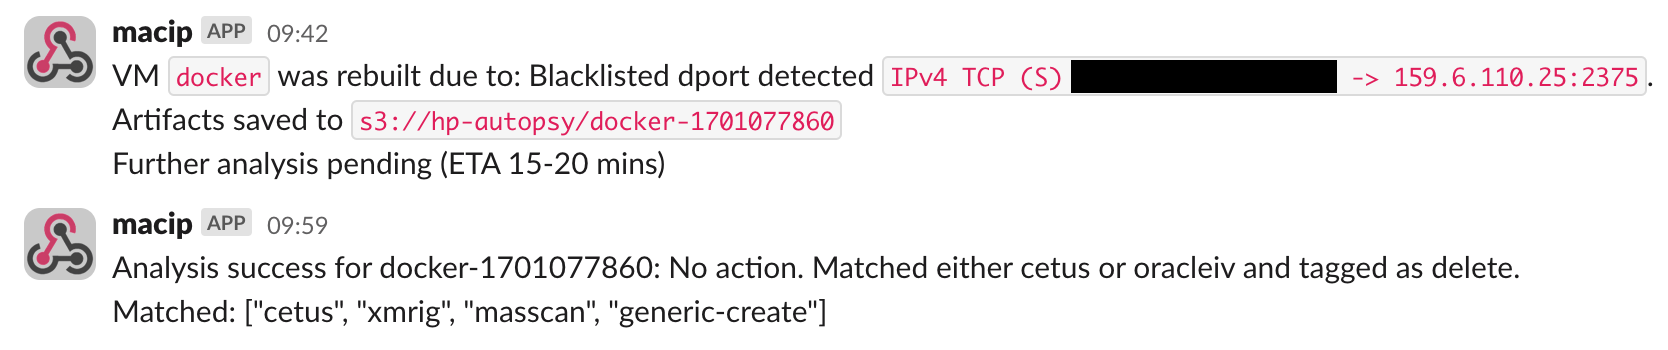
The guardrail discarding an autopsy due to it matching another attack
Findings
Cado Labs currently run the following honeypots:
- Confluence
- Docker
- Jupyter
- Kubernetes
Since deployment, over 200 compromises have been detected and autopsied, with the majority originating from Docker, followed by Jupyter. Triage of autopsies for Docker and Jupyter directly led to the discovery of the Qubitstrike and OracleIV campaigns.
Interestingly, the most frequent attack observed on the docker honeypot is Cetus, a malware family used by TeamTNT. It would appear that the C2 servers for this campaign are long dead, but agents installed on still compromised systems continue to worm onto new servers.
OracleIV was first observed on our honeypot after the network usage alert went off and the box was autopsied. We examined the logs, along with the memory, and discovered references to the OracleIV Docker Hub image. This consisted of logged API calls to the image create endpoint, as well as the process name oracle.sh being visible in the memory analysis.
We first observed Qubitstrike after the CPU usage alert fired - as it deploys a cryptominer. In the lead up to this, we also received alerts as the malware had read and exfiltrated the AWS credentials, which the attacker later tried to use. After the autopsy completed, we quickly identified that a terminal session had been opened in jupyter using the log, and quickly identified that xmrig and a few attacker scripts were running using the memory capture. We also observed that the bash history contained a log of all commands run by the attacker. All of this combined allowed for a swift triage and analysis of the malware.
To conclude, Cado’s cloudypots system has proven itself in battle and has gained us the upper hand against attackers, providing us with new discoveries and valuable threat intelligence. The honeypot will continue to be expanded, with new services and features added, allowing us to uncover novel attack techniques and rapidly respond to new trends and exploits used by attackers.
By Nate Bill
Tag(s):
Research & Threat Intel
More from the blog
View All PostsWatchDog Continues to Target East Asian CSPs
November 16, 2022Continue Reading
Investigation & Response Automation Becoming Vital in a Cloud Security Strategy
April 16, 2024Continue Reading
ESG Research Reveals 89% of Companies Negatively Impacted by Cloud Cyber-Attacks Prior to Full Investigation
November 16, 2021Continue Reading