


Introduction
This is the final part of our three-part blog series written by Cado Security and Invictus Incident Response, where we are investigating an incident that was discovered during an account audit of an Amazon environment.
Background
In Part one, we walked through the analysis of AWS logs that account DevOps1-bpvbp used to create an unknown account DevOps3 on at 21:29:03 UTC on 26–10–2022. Additionally the DevOps1-bpvbp account had initiated a StartSession which provided a connection to EC2 instance i-08e56d6b6c0439daf using Session Manager, at 21:29:53 UTC on 26–10–2022.
In Part two, we leveraged the Cado platform to investigate two hosts that were compromised by the threat actor to perform lateral movement and to create a bucket in Amazon S3. Additionally, data from a database on one of the compromised hosts was copied to an S3 bucket.
Investigative Questions
- Initial Access — How did the threat actor get hold of the original credentials (DevOps1-bpvbp)?
- Data Exfiltration — What happened to the data exfiltrated from the database (staff.txt)?
Initial Access
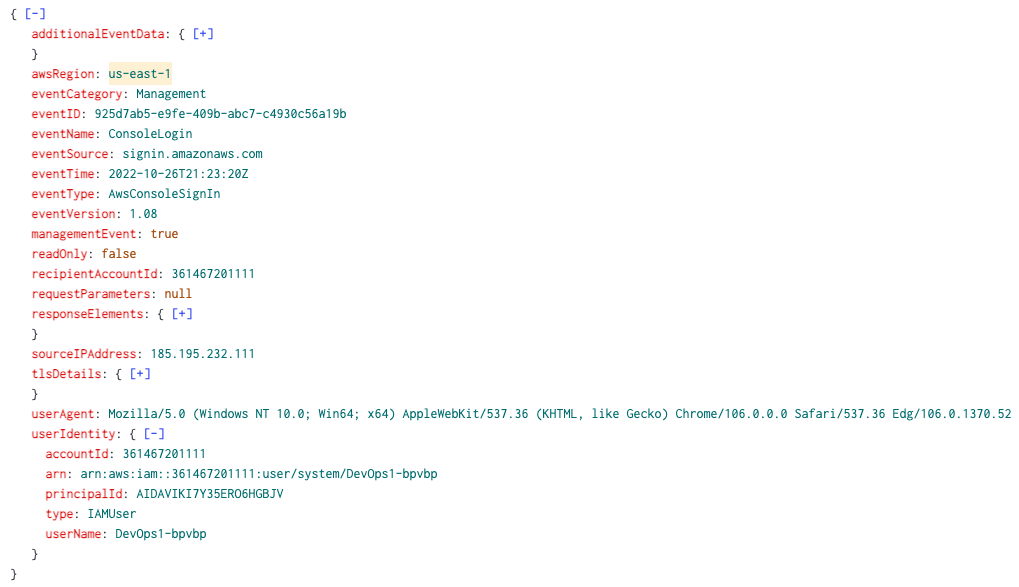
Let’s talk about how this attack started, based on earlier analysis described in part one, we know the first activity from the malicious IP address (185.195.232.111) occured at 21:23:20 on 26–10–2022 when a console login for the user (DevOps1-bpvbp) was observed. And on the same day at 21:29:03 a new user was created (DevOps3). To summarize we have the following information available:
- Username: DevOps1-bpvbp
- IP address: 185.195.232.111
- Earliest activity: 21:23:20 26–10–2022
The above information was gathered from CloudTrail analysis, however based on the above data points we didn’t see other information before that time. Initially, we used Invictus-AWS to collect data from the AWS account. As part of that acquisition, we collected CloudTrail, S3 logs and VPC flow logs. So far we only used CloudTrail, but let’s look at the other available information for our analysis.
S3 Access Logs
The logs are in web server access log format, every new line is a new entry, see more on the format here. If you use Splunk, you can use the aws:s3:accesslogs (sourcetype) that is part of the AWS add-on to automatically parse the logs.
Let’s use the available information points from above to search the access logs before the first known malicious activity.
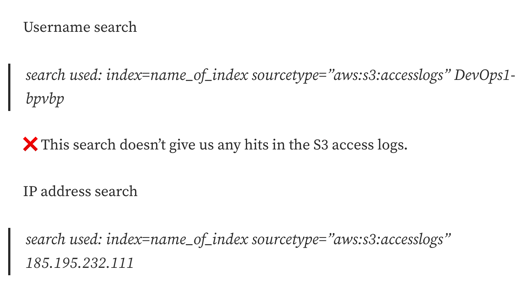
We get quite a few hits, most of them are after the first known malicious activity. There’s one log entry in the access logs that occurred one minute before the first malicious login as shown below:

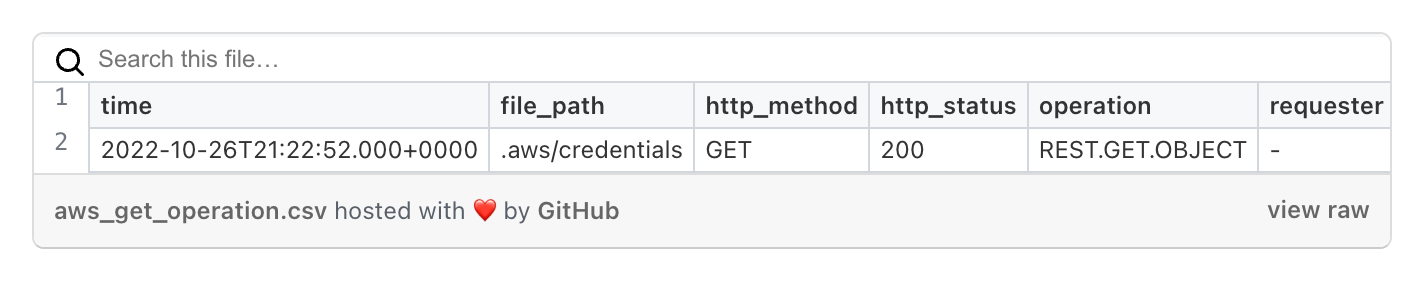
For readability, below is a table with the most interesting fields:
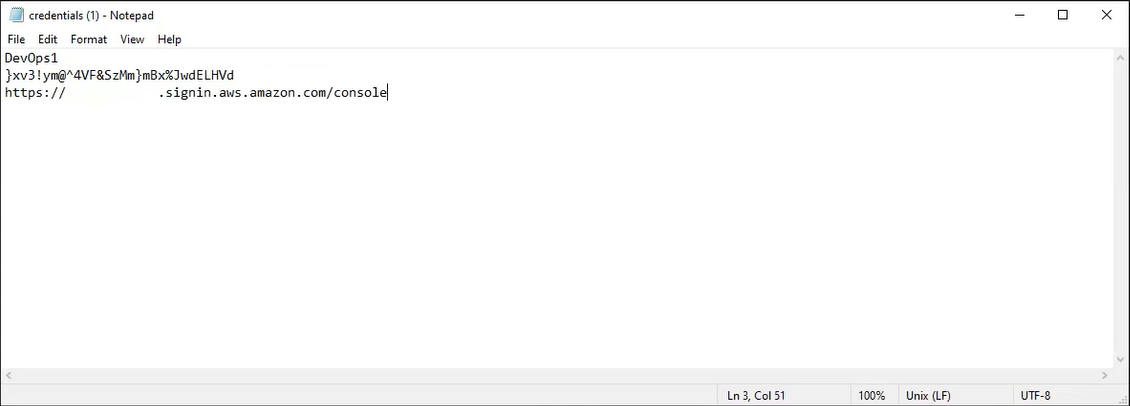
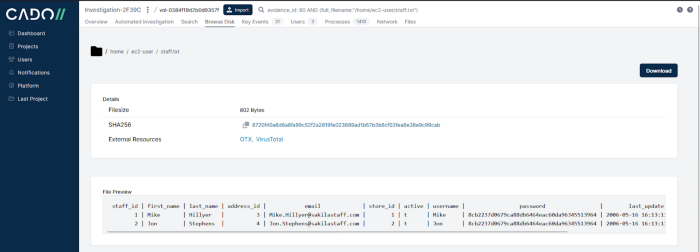
We requested the credentials file and a redacted version is shown in the picture below:
Based on the HTTP operation (GET) and the HTTP status code (200) we know that the threat actor downloaded this file. This explains how the threat actor was able to perform a console login one minute later.
In summary, we were able to determine that for initial access a valid account was used. We know this because the associated credentials were exposed through an accessible S3 bucket. This file was accessed by the threat actor and subsequently used to login and create a new user user and perform the malicious activity we’ve detailed in part one and part two of this series.
At this stage of the investigation, we know how the threat actor gained initial access, we know they were able to access several systems, move around and copy data to a S3 bucket. There’s still one piece of the puzzle missing. What happened with the data?
Data Exfiltration
As a refresher the threat actor executed the following two commands on one of the compromised hosts:

The first command leverages s3 mb to create a new bucket in the eu-west-1 region with the name eu-west-1-prod-data. The second command copies the staff.txt file to the newly generated s3 bucket.
To investigate what happened in a bucket, we can leverage several data sources.
- CloudTrail logging
- S3 server access logging
- AWS billing
CloudTrail
One of the great things about CloudTrail is its documentation. This page explains exactly what is logged in CloudTrail for S3 related events. The short summary is that there are two types of S3 logs:
- Bucket level activity: This activity is logged by default. An example of bucket level activity is the creation or deletion of a bucket.
- Object level activity: This activity is not logged by default in CloudTrail. An example of object level activity is the download of a file from a bucket.
To get the object level logs in CloudTrail you need to enable the so-called data events in a separate CloudTrail as detailed here. For this investigation this was enabled for the buckets already in place, but the threat actor created a new one which does not have this information. Therefore this is a dead-end.
S3 Server Access Logging
Another option for auditing S3 object level activity is enabling server access logging. This is especially useful in the scenario of a public accessible S3 bucket where people use browser and/or 3rd party tools to download files. Again, this logging was not enabled in this investigation.
AWS Billing
Our last resort is to leverage the billing details for an AWS account to identify data exfiltration.
Tip: AON wrote an excellent blog on using AWS billing to identify data exfiltration.
This is due to the fact that moving data out of the AWS cloud incurs costs. We use the AWS Cost Explorer to investigate costs incurred for data transfers to the internet from the S3 service. We looked at usage for 26–10–2022 and the days either side of it.
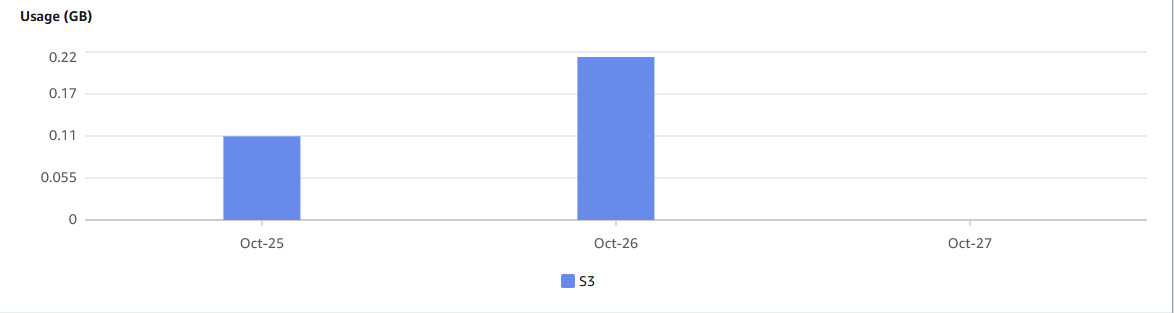
As you can see in the above picture, on 26–10–2022 there were data transfers amounting to approximately 200MB of data. Remember the staff.txt file was just 802 bytes:
We cannot get additional details on the source files or destination files were sent to. However, this is definitely bad news, and based on the available evidence we can make the following statement on data exfiltration:
Data was copied from an S3 bucket to a destination outside of AWS during the time period of interest.
Due to the fact that data access events in CloudTrail and/or S3 object level auditing was not available, we cannot provide additional details on data exfiltration activity. Based on this information, we need to assume data was exfiltrated.
Conclusion
In the final blog of this series we covered two of the most important questions in any investigation:
How did the threat actor get hold of the original credentials?
Based on the available evidence, we were able to determine that an incorrectly exposed credentials file in a publicly available S3 bucket allowed the threat actor to gain initial access using a valid account.
What happened to the data exfiltrated from the database (staff.txt)?
Where the answer to the first question is very clear and we have all the evidence to back it up. Unfortunately, that’s not the case for the second question. What we know is that there were data transfers during the time period of interest, therefore the sensible approach is to assume data was exfiltrated.
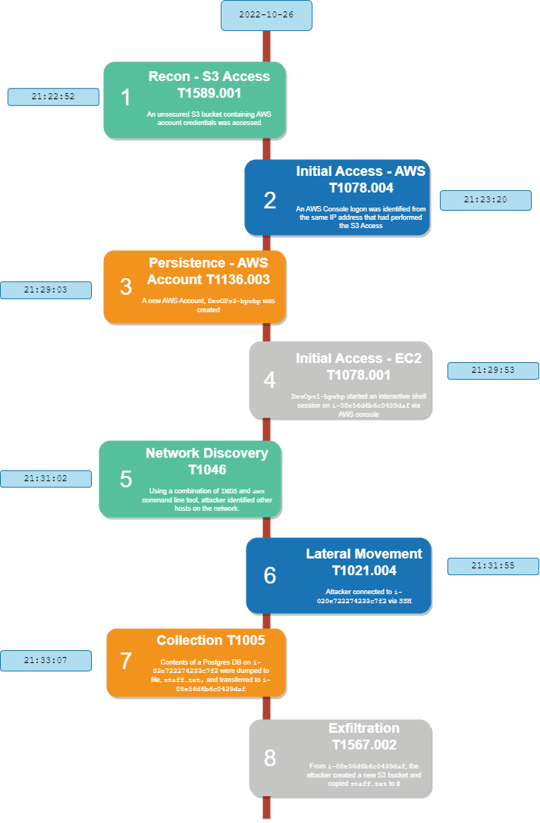
Timeline
We have created an incident timeline, detailing the phases and ATT&CK techniques from the associated framework.
Recommendations
Most incident reports end with some recommendations, specifically for AWS Incident Response and this type of attack we have the following recommendations:
Enable CloudTrail data events
Enable data events in CloudTrail. This will allow you to investigate what happened with your data in case of an incident. If costs are an issue, consider enabling data events for sensitive data at a minimum, you’ll thank us later.
Protect and monitor S3 buckets
Storage buckets often contain your most important data, so be sure to monitor access and prevent unwanted access. This includes limiting publicly visible S3 buckets. This has been a common issue for lots of organizations, therefore Amazon has already decided to change the default visibility and make it more difficult to accidentally expose buckets.
Tip: This blog by (https://medium.com/@cloud_tips) is an excellent guide on the different available options to protect your S3 buckets.
Develop a capability to perform cloud forensics/investigations
The cloud is different, but it’s also similar to an on-premise environment and its challenges. If you move systems to the cloud you still want to be able to investigate what is happening or what has happened on a system. Therefore, it’s critical to develop an investigation capability for your cloud systems. The cloud logs will tell you part of the story, but not the full story as you’ve seen in this blog series.
Tag(s):
Cloud Investigations